Rancocas Nature Center
  • Home
  • Special Events
  • Trail Map
  • Visit the Center
    • Visit
    • Gardens & More
    • Nature Store
    • Nature Museum
    • Restrooms
  • Jobs
  • About Us
    • About Rancocas
    • Friends of Rancocas
    • Our Staff & Educators
    • Rancocas Creek History
    • Gallery
    • Testimonials
    • Contact Us
  • Spring 2026 Programs
  • Summer 2026 Kids Programs
  • Book a Program
    • Preschool Group Programs
    • Elementary School Programs
    • Birthdays
    • Adult Programs
    • Library Programs
    • Homeschool Programs
  • Google Calendar
    • For Kids & Families
    • For Teens & Adults
    • Google Calendar
  • Membership
  • Photography Club
  • Sponsors
  • Donate
  • For Scouts
    • BSA Merit Badge Programs
    • Cub Scout Program
    • Girl Scouts USA Programs
    • Maple Sugaring for Scouts
    • Scout Service Projects
    • Orienteering
    • Scout Service Hours
  • E-blast
  • Volunteer
  • Wish List

Miss Jess's Nature Craft Corner


​Miss Jess misses teaching her little friends on Fridays, so she wanted to reach out each week virtually to share some easy activities to do with your little ones at home.

Beach Casting


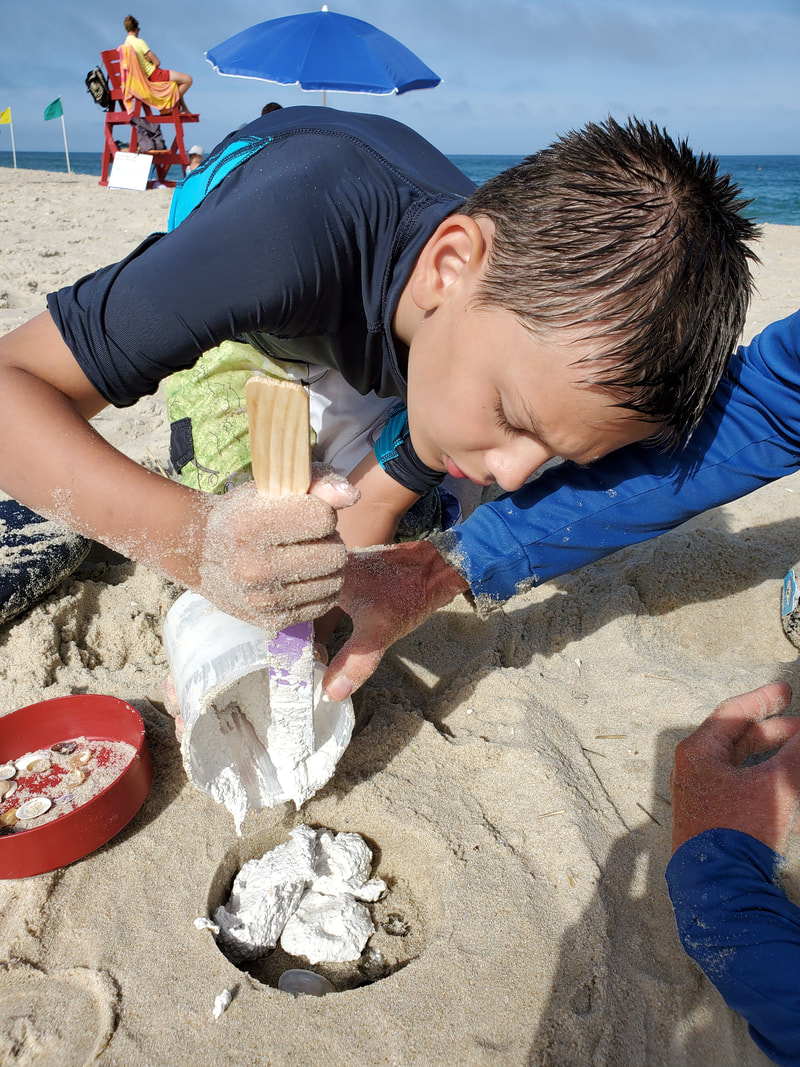
With summer officially here we are taking this week's project to the beach! (or sand box.) All you need for this project is plaster powder, fresh water, a mixing container, paint stirrer, take out tray or wide bowl, sand and shells.
Picture
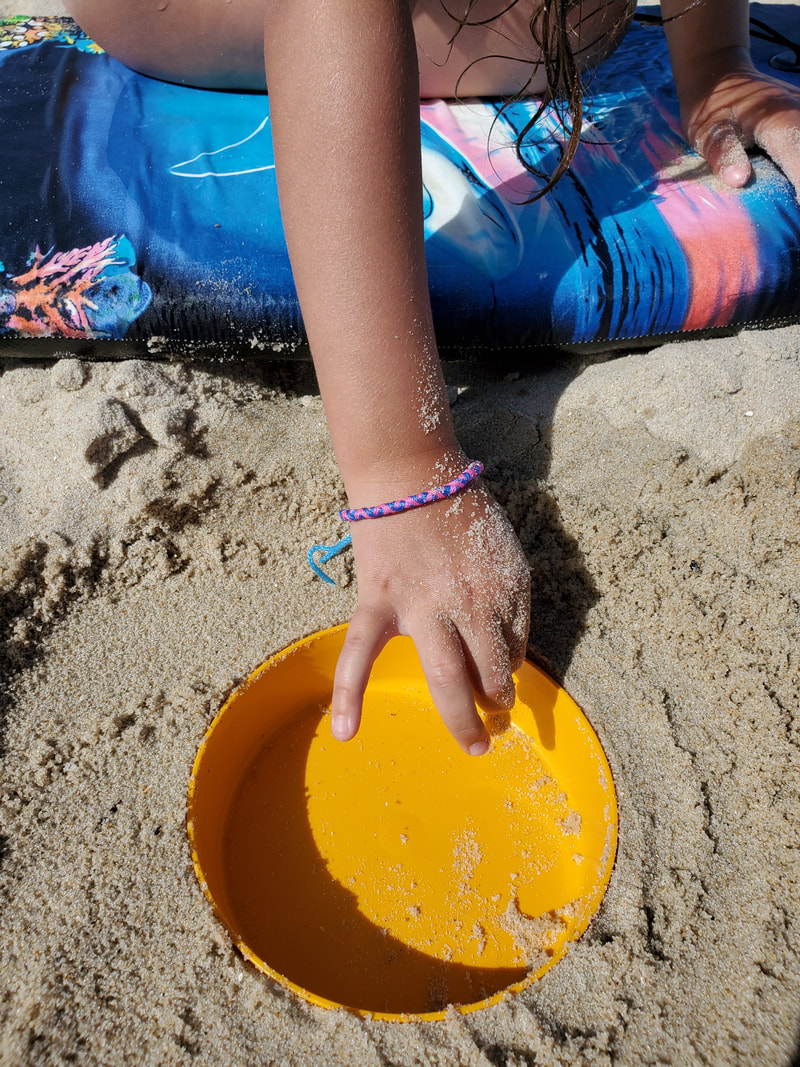
Step One: Find or make damp sand. Press a circular bowl into the sand to make a depression that will be the mold. 
Picture
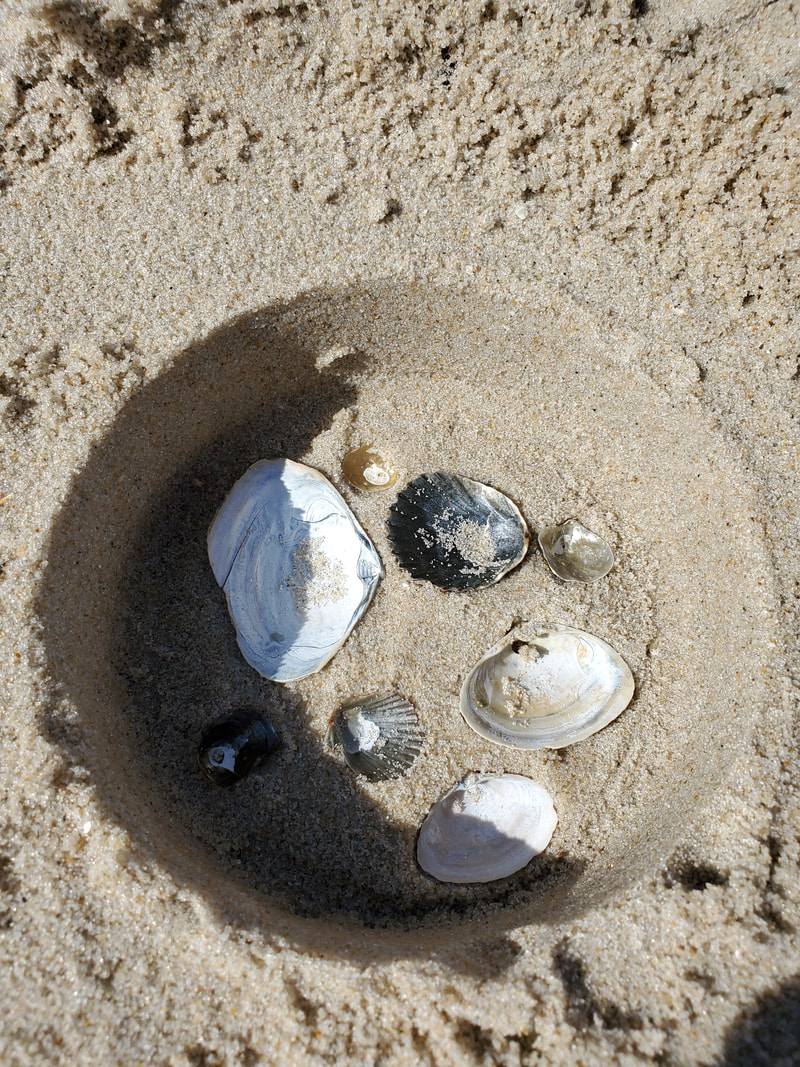
Step Two: Arrange your shells at the bottom of the depression, pretty sides face down. Press them in until they are flush with the sand level. (The bottom will be the top later.)
Picture
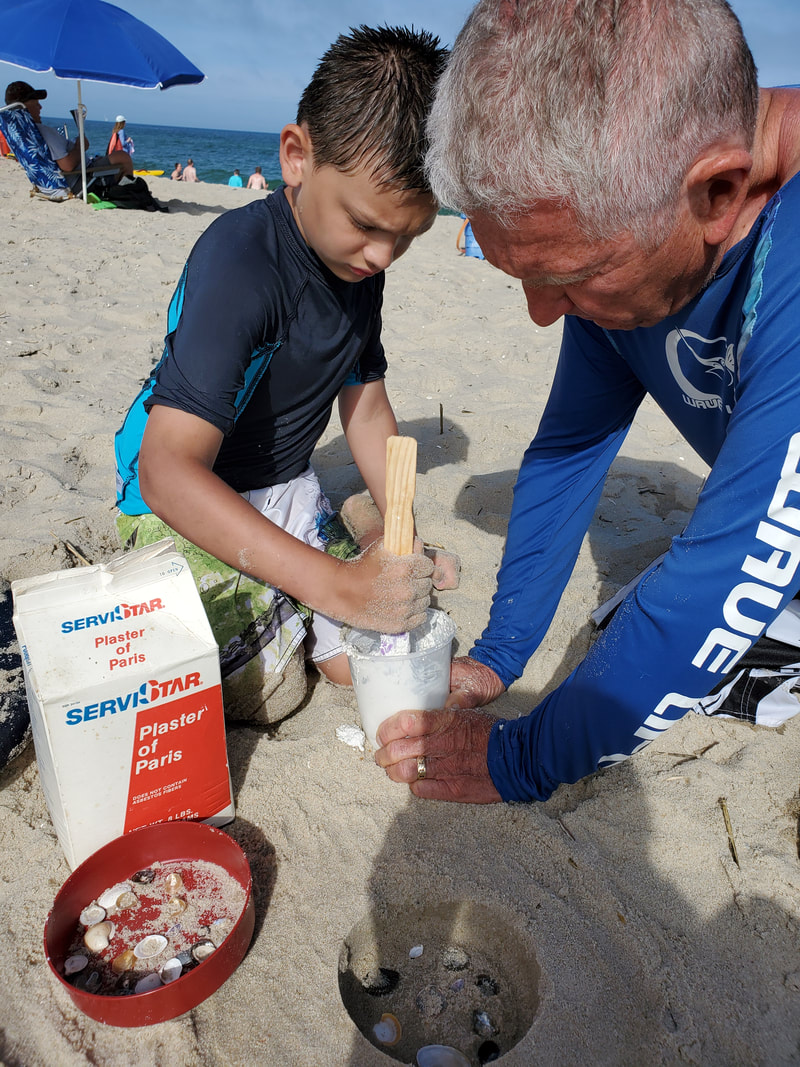
Step Three: Put about 2 cups of plaster powder (more or less depending on how big your mold is) into your mixing container. Add a little bit of water and mix. Keep adding water while mixing until the plaster is about the consistency of yogurt. 
Picture

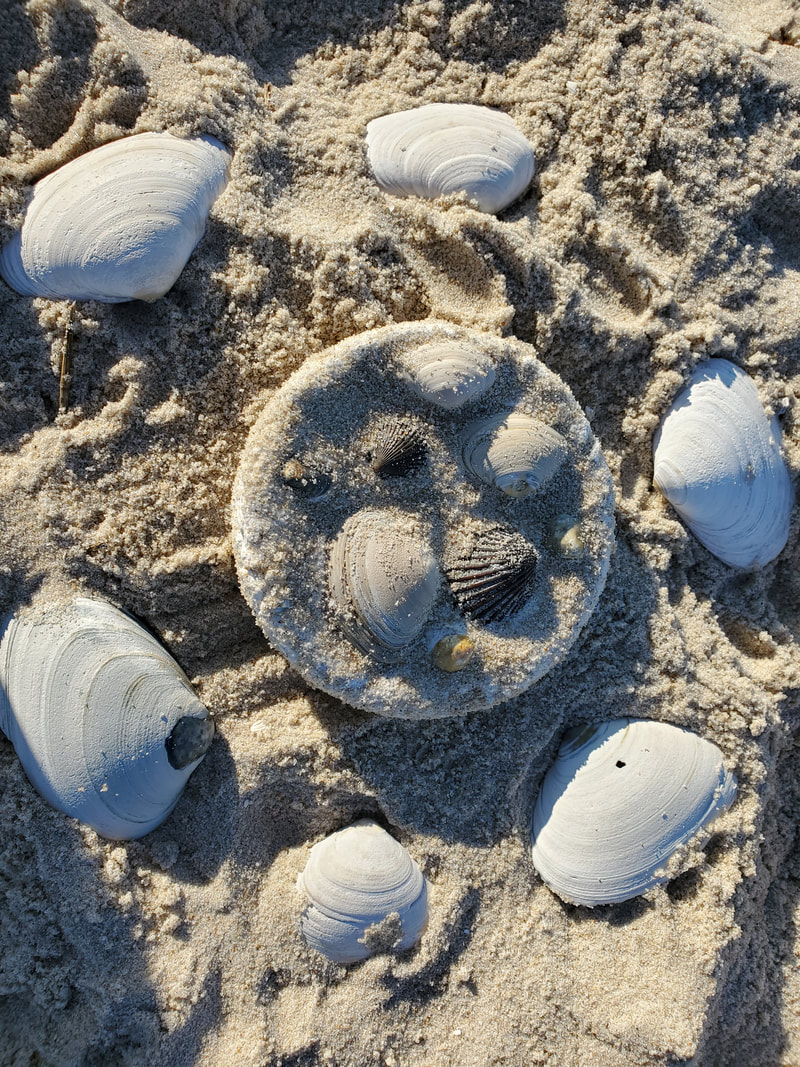
​​Step Four: 
Pour the plaster into the mold right on top of the shells so it is about an inch or two thick.


Step Five:

Let the plaster set for about an hour.


Step Six:

Once the plaster is hard, dig it out.
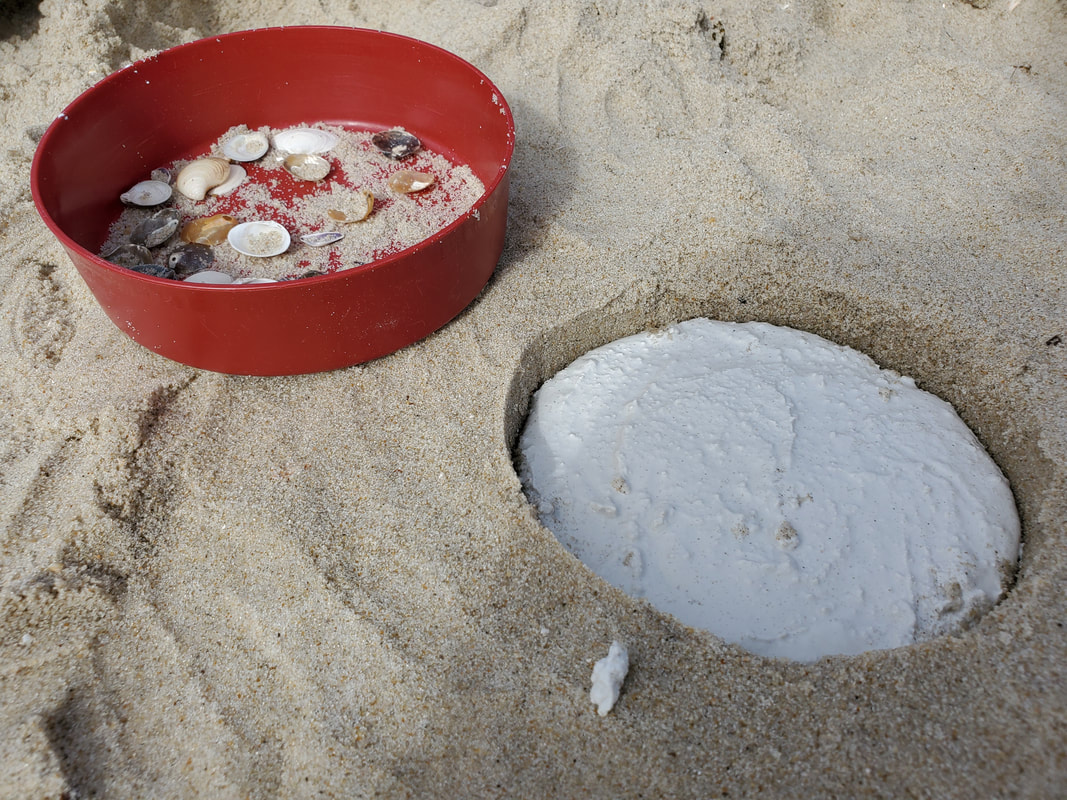
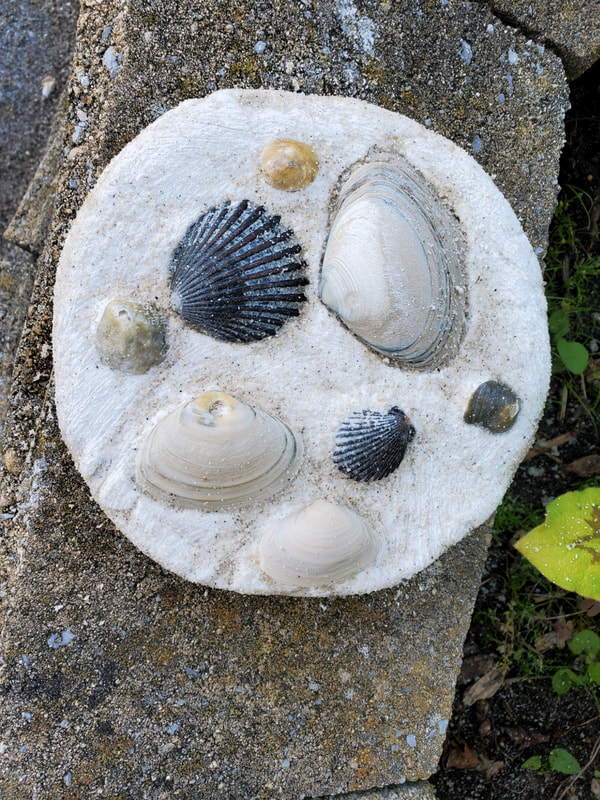
​

Picture
Picture
Picture
Picture
Step Seven:
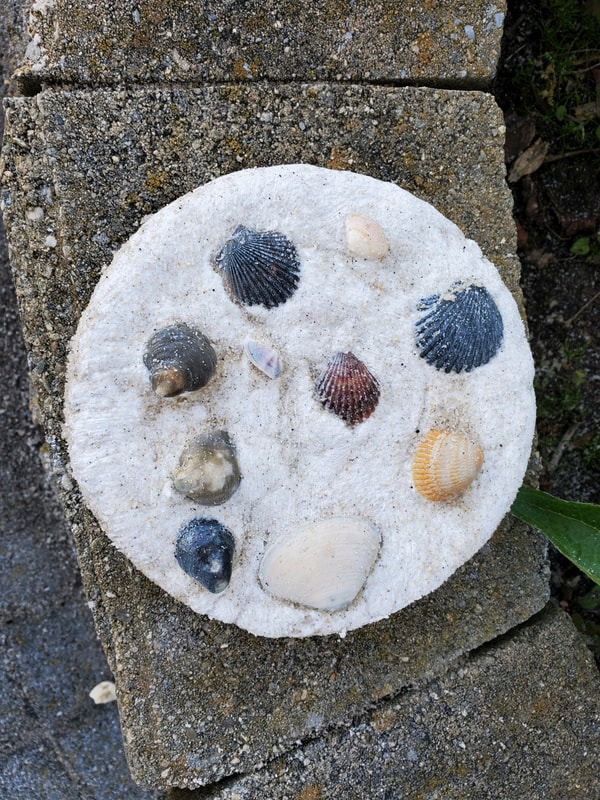
Let the plaster dry a little more, then brush the extra sand off, and enjoy your little piece of the beach!

Flower Pounding


This week's craft really gets your aggression out! This craft utilizes the natural pigments in flowers, which you'll pound out onto paper or fabric. You can make paper bookmarks, paper cards, frame a paper design, and you can even print on natural fabric (cotton or silk). Materials include: paper or natural fabric, flowers and leaves, hammer, painters tape (or paper towel), and phone book (or other soft cover book to hammer on to soften the blow)
Picture
Step One:
​
Put your paper on a phone book. Lay flowers, pedals, and/or leaves face down on the paper. 
The darker the flowers, the better they'll work. The thinner and less waxy the leaf, the better they'll work. 
Picture
Step Two:
Take painters tape and stick it to your clothes 10 times to get it less sticky so it won't rip your paper when you pull it up. Once your flower is exactly where you want it, cover it entirely with tape. (If you don't have tape, you can lay a paper towel on it instead.)
Picture
Picture
Step Three:
Get your hammer and start pounding!
Actually, it's more of a tapping.
​If you pound too hard, the juice will squirt out from the edges.
Picture
Picture
Picture
Picture
Step Four:
​
Peel up the tape super gently to reveal your flower impression. You can keep adding more impressions until you are happy with your design. If you used fabric instead of paper, just toss the dyed fabric in the dryer on high heat for 20 minutes to heat-set it so that the dye will be little more permanent.

Nature's Patterns

​
​This was a fun one. It took some time to prepare, but the kids had fun finding patterns in nature. This really had them looking at things in a new way. Very few supplies are required; just a piece of thin cardboard, a pencil and marker, scissors or box cutter, photo of your child makes it more personal, and glue. 
Picture
Picture


Step One: 
Find a piece of cardboard thin enough to cut with scissors (I used a cereal box) and glue the cut-out photo near the top. (If you don't have a photo, you can just draw the head.)
​

Step Two: 
​Draw a simple body attached to the head. I outlined it in black.


​Step Three:
Choose the piece, or pieces, of clothing that you want the nature patterns to show up through, and cut those parts out.

For my son, I cut his shirt and socks out, and for my daughter, her dress and purse were cut out.

​I found a utility knife to work well for this part.
Picture
Step Four:
​You are ready to go! Go outdoors and hold your person up to different natural objects, and notice how the outfits change in each. Experiment with different colors, textures, brightnesses, patterns, living vs. non-living objects, etc.
Picture

Recycled Bird Feeders


This week our craft is for the birds!
Picture
Picture
​Step Seven: 
​
Time to paint!

​When it's dry, if you have a can of clear coat, it can't hurt to give it a coat. But it's not necessary if you do not have it, as acrylic is waterproof.


(My daughter picked red because she said birds see red the best... forgot I told her that once!)
Picture

​Step Eight:
Tie a string on the top.


Step Nine:
Stick a chopstick, kebab skewer, popsicle stick, or stick from outside... whatever you can find, under the window. Push it in through one side and out the other so it lays horizontal.


Step Ten:
Fill the bottom with birdseed and hang.

​The feast is ready for your
feathered friends!
Supplies for this one include: 
​At least 2 waxed cardboard milk or juice cartons (we made 2 feeders, so we used 3 cartons), acrylic paint, box cutter, chopstick, glue gun, & string. 
(Primer and protective clear coat are optional, but helpful.)
Picture

​​Step One:

Prime your cartons. (This helps the paint stick, and covers the writing on the carton). Not completely necessary if you don't have it.

Step Two:
Cut down along 2 opposite corners of one carton. Then cut off the top and the bottom off. This makes 2 roofs.


Step Three:
Then, on a different carton, cut the window hole about 3 inches from the bottom. You can do 1 or 2 windows. (If you do 2 windows, make sure they are on opposite sides.)


Step Four:
Poke holes under each window where the stick will be inserted so the birds can stand and eat.


Step Five:
Cut the plastic spouts on the top of the carton off so that the roof will lay correctly.

Step Six:
​
Fold the roof piece so it fits snuggly, hot glue gun it into place, poke 2 holes in the middle on top to hang it from.
Picture
Picture

Journey Stick


This project is based on an Australian Aboriginal tradition of collecting objects while on a journey and tying them on a stick in chronological order. After they'd arrive at their destination, they could retell their journey by looking at the objects tied to their stick. We had a good time making this one, and the supply list is short: either rubber bands or string... that's it!

Step One: Stuff your pockets with either rubber bands or pre-cut pieces of string.
​

Step Two: Go out on a hike and find a favorite stick. Sticks can be long or short. 
Picture
Picture
Picture
Step Three: As you hike, look for cool objects. Stones, sweetgum balls, tree bark on the ground, flowers, seed pods, acorn caps, etc. are all cool finds! (Of course be aware of what children are picking up, ie: glass, scat, poison ivy!)
Picture


In the end, the journey sticks not only look beautiful, but they are a great reminder of the places you've visited, and the adventures you and your children went on!
Picture
Picture


​Step Four: 
As you find each object, fasten it to the stick.


​
Step Five:
​
When you return home, each child gets a chance to look at their stick and retell the story of their journey.


​
Picture

​Solitary Bee House


​We all have those extra mugs in the back of the cabinet that we never use... why not turn them into a bee home! For this craft, you just need: a mug, some paper straws, wire, and acrylic paint if you choose. 
Picture
Picture
Step One: Pick any mug you like and if you are feeling creative, paint or decorate it with acrylic paint and/or acrylic paint pens. Paint a design that would look fabulous in your garden (just remember your mug will be hanging by the handle when planning your design). If you have a can of spray paint clear coat, give it a few coats to help protect your painting from the elements. 
​

Picture
Step Two: Cut the paper straws so that when you push them into your mug, they are inside about a 1/2 inch from the rim (you want them to be protected from rain).
​

Picture
Step Three: Rubber band all your straws together and stuff them tightly into your mug. The rubber band helps keep them in. 
Picture
Step Four: Wrap wire around the handle of the mug as a hanger. Make sure the mug is level (or even slightly tipped forward.) You don't want water pooling inside.
Picture
Step Five: Hang your new bee home in your garden and enjoy watching solitary bees move into their new home. 

​Important note, at the end of September, take the straws out and clean your mug well.
Next spring, put fresh paper straws in and keep reusing your bee home.
​We want to keep our bees healthy!
Pressed Flower Stained Glass
This activity uses materials you probably have around the house: wax paper, crayons, a hand pencil-sharpener, and an iron. This craft takes a few days because you have to press the flowers first and let them dry.
Step One: Pick flowers that can be easily pressed (violets, pansies, honeysuckle, etc.)
Picture
Step Two: Sandwich the flowers in a heavy book between pieces of wax or parchment paper as to not warp the pages in your book. Allow a few days for the flowers to dry.
Picture
Step Three: After a few days, each child gets a piece of wax paper to arrange their dried flowers on.
Picture
Step Four: Use a pencil sharpener to sharpen various crayons into separate small containers or piles. 
Picture
Picture
Picture
Step Five: Have your kids sprinkle various colors of crayon shavings onto their wax paper. If you mix all the colors you get brown, just like in painting, so be sure to pick and place your colors wisely!
Picture
Step Six: Put a clean sheet of wax paper over the first sheet and get ready to iron.

Step Seven: Put a clean sheet of parchment paper under the wax paper and another sheet on top to keep the wax from leaking out onto your ironing board.

Step Eight: Set your iron to medium heat. Iron and watch the magic! It doesn't take long to melt. Only about 2-3 passes are necessary.
Picture
Step Nine: Wait a few minutes for the wax paper to cool.

Step Ten: Trim the edges. Optional: Create a frame using popsicle sticks or paper.

Enjoy your creation as is... then hold it up to the window to REALLY enjoy!!
Picture
Picture
Collect & Create!
Step One: Go on a walk with a bag. Collect things that look cool and are ok to pick. These can be rocks, leaves, flowers, seeds, berries, cones, grass, etc.
Picture
Step Two: When you get home, dump all the treasures into a tray so your children can see them.

Step Three: 
Give each kid a paper plate or a piece of paper. You can also do this outside on the ground.

Picture
Step Four: Have your kids arrange the materials to make faces, foods, or whatever else they can think of. 
​
Step Five: When done, dump the materials in your compost.
Picture
Picture
Picture
Picture
Picture
You can make all kinds of faces.
Or designs!
Even a cake!

​Happy collecting & creating! 
Home
About
Contact
Rancocas Nature Center
794 Rancocas Rd., Westhampton, NJ 08060
609-261-2495
©1977 - 2025 ~ All Rights Reserved
​RancocasNatureCenter.org
Privacy Policy
  • Home
  • Special Events
  • Trail Map
  • Visit the Center
    • Visit
    • Gardens & More
    • Nature Store
    • Nature Museum
    • Restrooms
  • Jobs
  • About Us
    • About Rancocas
    • Friends of Rancocas
    • Our Staff & Educators
    • Rancocas Creek History
    • Gallery
    • Testimonials
    • Contact Us
  • Spring 2026 Programs
  • Summer 2026 Kids Programs
  • Book a Program
    • Preschool Group Programs
    • Elementary School Programs
    • Birthdays
    • Adult Programs
    • Library Programs
    • Homeschool Programs
  • Google Calendar
    • For Kids & Families
    • For Teens & Adults
    • Google Calendar
  • Membership
  • Photography Club
  • Sponsors
  • Donate
  • For Scouts
    • BSA Merit Badge Programs
    • Cub Scout Program
    • Girl Scouts USA Programs
    • Maple Sugaring for Scouts
    • Scout Service Projects
    • Orienteering
    • Scout Service Hours
  • E-blast
  • Volunteer
  • Wish List